485通信
購入先 アマゾン
購入時価格 ¥8,198 (最近は値上がりしているようです)
構造
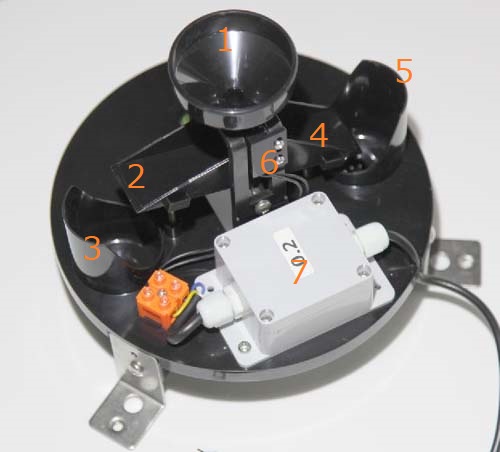
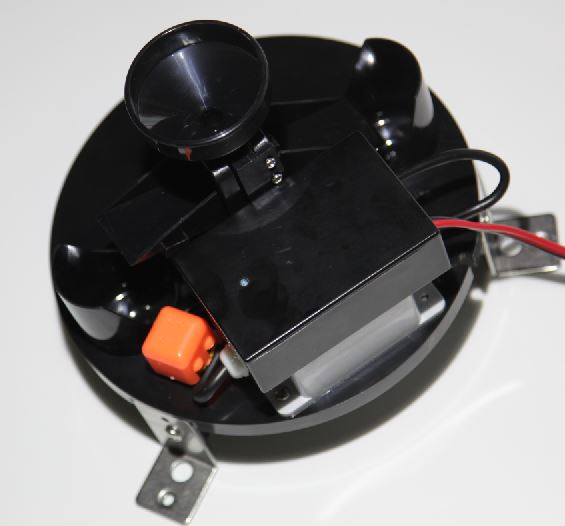
カバーを外すと上図のような仕組みが現れる。
上部の丸い漏斗①から入った雨滴はその下部にあるシーソー状に配置された受け皿②に落ちる。
溜まると(0.2mm/1回)シーソーがカタっと下に下がり排出口③から排出される。
②はシーソーなので下がると④が上がって来る。
そして雨滴は今度は④に溜まるようになり、一杯になると下って⑤に排出される
以上の動作は、雨が降る間繰り返される。
シーソーの真ん中の軸付近には、センサーが設けられていて、このシーソーの上下する回数
をカウントしている。
⑦の部分にその処理回路が入っている。
RS485形式で外部と通信出来る。
主な仕様
サイズ: 直径200mm円筒形
解像度:0.2mm (オプション0.5mm)
測定誤差:±0.32mm
降雨強度範囲:0~4mm/分
許容最大降雨強度:8mm/分
インターフェース:RS485(標準Modbus-RTUプロトコル)
電源電圧:DC4.5~30V
最大消費電力:0.24W
保管温度:-40~125℃
通信パラメーター
8bit パリティー->無し ストップビット->1 エラー検証->CRC16
ボーレート 1200/2400/4800/9600/19200/38400/57600 bit/s
レジスタ
0000H 降雨量 読み取り値=実際の値x10倍
07D0H スレーブアドレス デフォルト->1
07D1H ボーレート 0->2400 1->4800 2->9600 3->19200 4->38400 5->57600 6->115200 7->1200
変更可能なパラメータ
スレーブアドレス
ボーレート
その他
スレーブアドレスを確認するコマンド
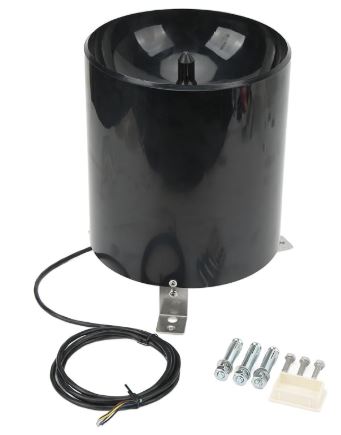
RS-YL-N01-2は、中国の「建大仁科」というメーカーが製造している「転倒バケツ雨量計」です。
RS-485 通信と Modbus RTU プロトコルを使用する雨量センサーです。
大きさは、アマゾンなどで売られている小型の超音波加湿器の大きさです。
「RS-YL-N01-2雨量計」は転倒ます型で、センサー内部のマイクロコンピュータが24時間体制で常時
カウントを行うため、CPU(Arduinoなど)から「測定を開始せよ」というトリガーを送ることはで
きません。
CPU側で制御できるのは、Modbus通信を用いて「蓄積されたデータをいつ読み出すか」のみです。
Windows PCを使用して機器の事前チェック
RS485機器には、スレーブアドレスという固有の番号が振られています。
この転倒バケツ雨量計の場合デフォルト値は0x01に設定されています。
またデフォルトの転送ボーレートは4800bit/sです。
通常RS485の先頭機器(RS485I/F基板) 及び終端機器(転倒バケツ雨量計)には終端抵抗120Ωを配置する必要があります。
今回のような小規模設備の場合、終端抵抗が無くても一応動作はしますが、本機の説明書にはその記載
が見当たらないようです。(内部にあるのかもしれませんが不明)
機器に近い位置の黄色と青色ケーブル間に120Ωの終端抵抗を取り付けます。(無くてもテストは可能です,私は付けませんでした。)
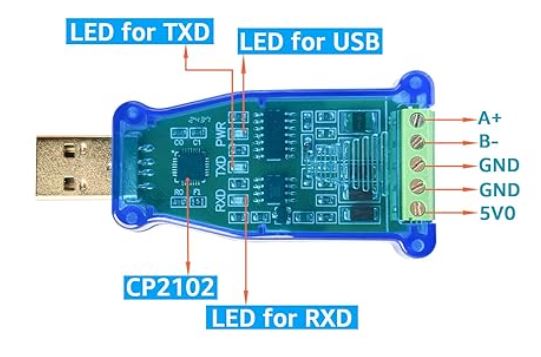
購入先 アマゾン 購入価格¥2,699
まず転倒バケツ雨量計の付属ケーブルの黄色をI/FのA+ へ青色をI/FのB-へ 接続します。
RS485 I/Fとの接続は以上です、他の端子は使いません。
RS485 I/Fの+5V端子には何も接続しません。
電源ははPC本体のUSB端子経由で供給されています。
転倒バケツ雨量計の方は、DC5Vが必要ですので+5Vを転倒バケツ雨量計の茶色ケーブルへ供給し
ます。
5Vのマイナス線は転倒バケツ雨量計の黒色ケーブルに接続します。
5V電圧は、こうゆう小電圧機器にとっては危険なので電源は最後の最後に十分に確認して
から通電するように心がけて下さい、間違うと一瞬でWindowsPCを含めて全損規模の故障になってしま
いますのでくれぐれも注意して下さい。
PCのUSB端子に差し込む前にPC側にRS485用のソフトをインストールします。
「ヒューマンデータ」さんのHPに「Modbus Tool for Debug 」というのが掲載されていて使用して良いと書かれていますの有難く使わせて頂きます、とても使いやすいソフトだと思います。
https://www.fa.hdl.co.jp/jp/html/app/Modbus_Tool/index.html
このソフトの機能を使って転倒バケツ雨量計にコマンドを送りますが、最低限コマンドの仕様を知っ
ていないと使えませんのでここでは、最低限必要なコマンドの内容を説明します。
通信方式は、「MODBUS-RTUプロトコル」といいます。
長距離、複数台接続、CRCエラー検知などに対応した方式です。
全部を習得するには複雑で大変すが、転倒バケツ雨量計などをDIYで設置する場合などでは、必要最低
限知っていれば問題ありません。
必要最低限必要なコマンドとアドレスなど
通信は以下のフレーム構造で行われます。
CPUからのリクエスト
機器のアドレス 機能コード 開始アドレス 長さ チェックサム下位 チェックサム上位
1バイト 1バイト 2バイト 2バイト 1バイト 1バイト
機器からの応答
機器のアドレス 機能コード 有効バイト数 データ1 データ2 N番目データ チェックコード
1バイト 1バイト 1バイト 2バイト 2バイト 2バイト 2バイト
●現在の降雨量読み取り(01 03 00 00 00 01 84 0A)
1、機器のアドレス->0x01
2、機能(読み取りコマンド) 0x03 (Read Holding Registers)
3、開始アドレス->0x00 0x00
4、データーの長 ->0x00 0x01(16進)
5、CRC-16値 (数値の並びが下位、上位の順になっているので注意 リトルエンディアンという並び)
0x84 0x0A
CRC-16値は、送信したバイト、今回の場合先頭から6バイトの値を元に決められた多項式で計算
して決められます。
「Modbus Tool Debug」を使って送信する際には、CRC-16は自動計算されますので入力は不要で
す。
●上記の応答フレーム
データー読み込みコマンド03hを送信すると機器側から7バイトの返信が帰ってきます。
先程送信した場合には「01 03 02 00 1A 39 8F」が返送されます。
1、機器アドレス->0x01
2、機能->0x03
3、転送バイト数->0x02
4、データー->00 1A
5、CRC16 39 8F
この1例の場合雨量データーは00 1Aの部分です。
1A->26(10進数)ですが、10倍値になっていますので実際の数値は2.6mmになります。
シーソーが1回カタと動くと数値は2となり実際の値は1/10で0.2mmとなります。
●現在のボーレートを変更する 4800->9600
デフォルトの転送ボーレートは最初4800ですが、ここでは9600に変更します。
要求コマンド 01 06 07 D1 00 02 59 46
応答 01 06 07 D1 00 02 59 46
本システムのスクリプトでは9600ボーでの動作を考えて作られているので事前にこの操作を行ってお
きます。
Modbus Tool for Debugの起動
以上迄理解した上でRS485 I/FをPCのUSB端子に接続し、更に5Vの電源を入れます。
そしてPCの「Modbus Tool for Debug 」ソフトを起動します。
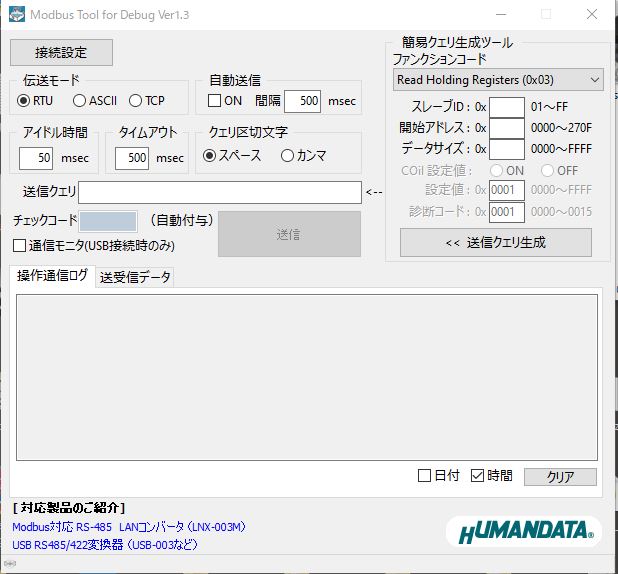
左上にある「接続設定」をクリックします。
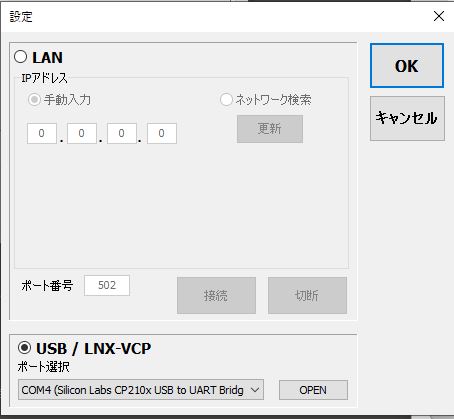
そして「ポート選択」のところは▽をクリックして「Silicon Labs CP210x USB to UART …」を
選択します、最後に「OPEN」をクリック。
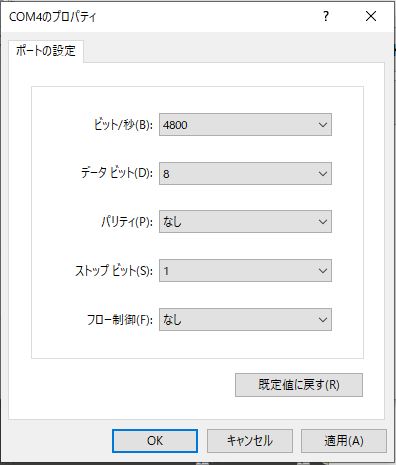
送信して見ます。
コマンドは「送信クエリ」の文字の右側にある欄に手動で01 03 00 00 00 01 84 0A(数字は2文字ずつ
記入してスペースを1個開ける書き方)
入力して最後に「送信」ボタンを押します。
別の方法として右にある欄にコマンドを記入して最後に「送信クエリ生成」ボタンを押す方法も
あります、この方法ではCRC16の値は自動で生成されます。(下図)
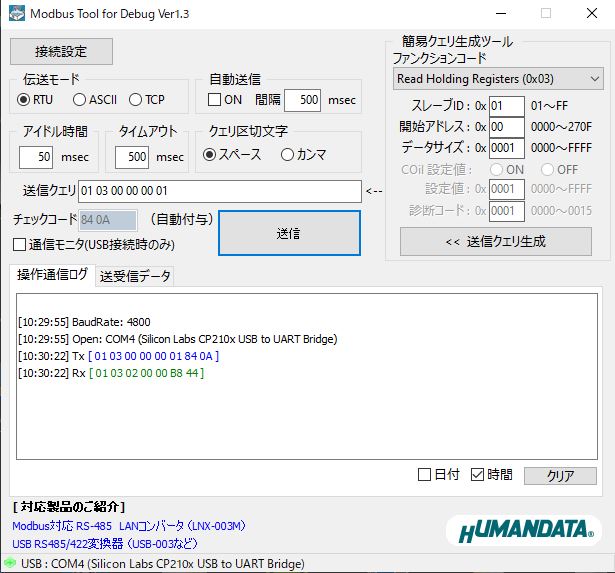
現在0mmです。
次に雨量計の雨滴を集めるシーソー部分を手でカタッと1回動かしてから再度コマンドを送信します、
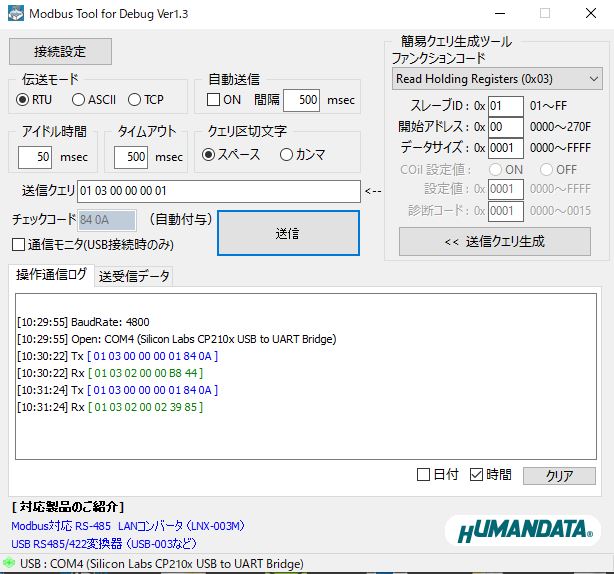
先頭から2番目は02に変わりました、読みの1/10が読み取り値なので0.2mmの雨を検出したことにな
ります。
正しく機能していることが確認出来ました。
設置準備の為ボーレートの変更4800->9600
今回は9600bit/sで動かすことにしますので4800から9600ボーに変更しておきます。
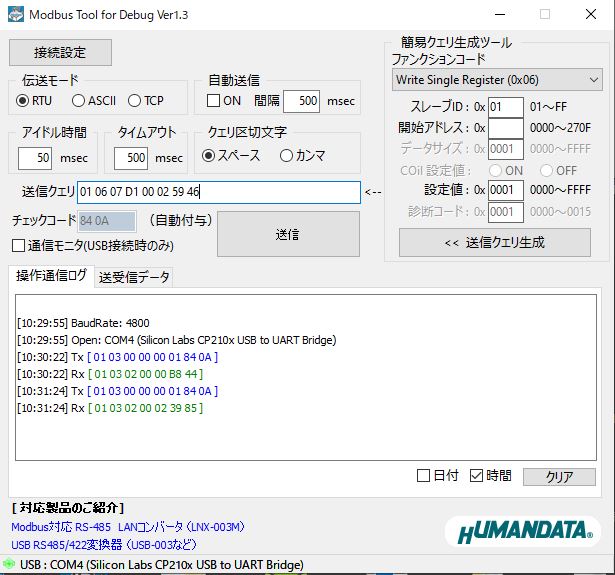
「送信クエリ」の欄にコマンドを入力して「送信ボタン」をクリックします。
これで以後の通信は9600ボーに変更されました。
以上でテストは終了です。
万一、転倒バケツを複数設置したりする場合には、スレーブアドレスを個々に違う番号に設定
する必要があります。
転倒バケツ雨量計回路図
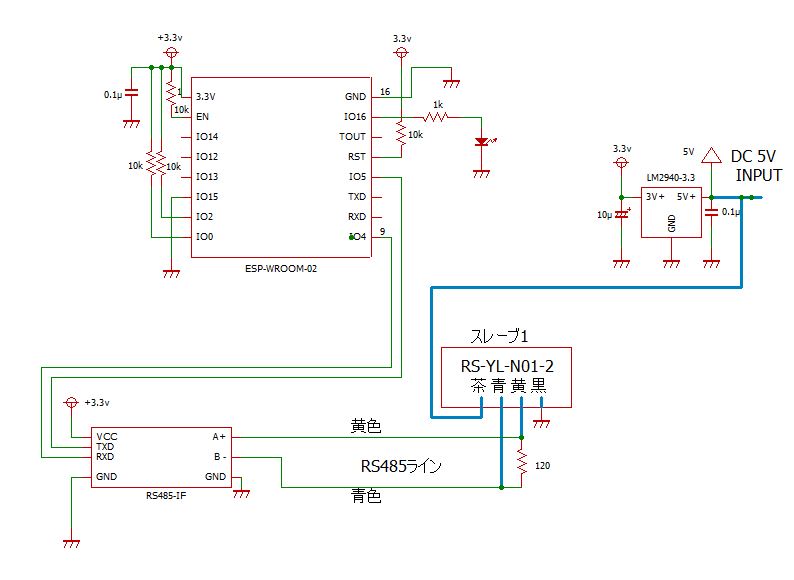
主な使用部品
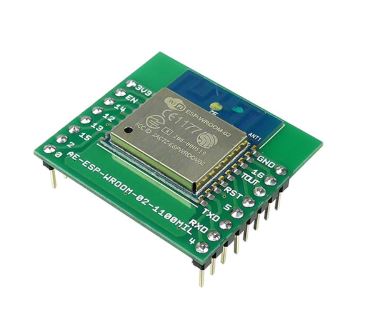
購入先 秋月電子 ¥580
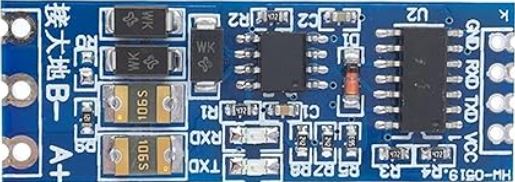
購入先 アマゾン
¥149(10枚単位での販売)
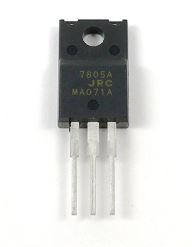
3.3V 1.5A
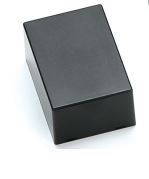
購入先 マルツ
購入価格 ¥275
ジャンパー線を半田付けしてショートして下さい。
上図の左側端子転倒バケツからの黄色->A+ 黒->B- のみ接続 接大地->何も接続しない
右側の端子 Vcc->3.3v TXD->ESP-WROOM-02のTX(Software Serialで5ピン)
RXD->ESP-WROOM-02のRx(Software Serialで4ピン) GND->GND
RS485 転倒バケツ降雨計スクリプト
ESP-WROOM-02(ESP8266)と、自動フロー制御(TX/RXの自動切り替え機能)付きRS485モジュールを使用した、毎時正分(00分)に1時間雨量をMQTT送信するスクリプトの完成品です。
また、ModbusMasterライブラリに頼らず、16bit CRC(CRC-16/Modbus)を手動で計算して付与・検証するロジック を内蔵しています。
#include <ESP8266WiFi.h>
#include <PubSubClient.h>
#include <WiFiUdp.h>
#include <NTPClient.h>
#include <SoftwareSerial.h>

#define LED      16
// MAX485モジュールの RXD を GPIO4(RX) へ、TXD を GPIO5(TX) へ接続します
SoftwareSerial modbusSerial(4, 5);

// --- 設定エリア ---
const char* ssid         = "your_ssid";
const char* password     = "your_passwd";
const char* mqtt_server  = "192.168.1.200";//Your MQTT Server Address
const int   mqtt_port    = 1883;
const char* mqtt_topic   = "rain_sensor/bucket";

const byte SENSOR_ADDR   = 0x01; // センサーのModbusアドレス(デフォルト0x01)
// ------------------

WiFiClient espClient;
PubSubClient mqttClient(espClient);
const char* pubtopicAck="rain_sensor/bucket/ack";
const char* pubtopicReset="rain_sensor/bucket/reset";
WiFiUDP ntpUDP;
// 日本時間(JST=UTC+9時間)に合わせるためオフセットを32400秒に設定
NTPClient timeClient(ntpUDP, "ntp.nict.jp", 32400, 60000);

uint16_t previous_rain = 0;
bool is_first_run = true;
int last_processed_hour = -1;
unsigned long bootTime = 0;

// Modbus用のCRC16計算関数
uint16_t calculateCRC(byte* buf, int len) {
  uint16_t crc = 0xFFFF;
  for (int pos = 0; pos < len; pos++) {
    crc ^= (uint16_t)buf[pos];
    for (int i = 8; i != 0; i--) {
      if ((crc & 0x0001) != 0) {
        crc >>= 1;
        crc ^= 0xA001;
      } else {
        crc >>= 1;
      }
    }
  }
  return crc;
}

// Wi-Fi接続処理
void setupWiFi() {
  delay(10);
  WiFi.begin(ssid, password);
  while (WiFi.status() != WL_CONNECTED) {
    delay(500);
  }
}

// MQTT再接続処理
void reconnectMQTT() {
  while (!mqttClient.connected()) {
    String clientId = "ESP8266Client-RainGauge";
    if (mqttClient.connect(clientId.c_str())) {
			mqttClient.subscribe(pubtopicAck);
			mqttClient.subscribe(pubtopicReset);
    } else {
      delay(5000);
    }
  }
}

// =====================================
// MQTT CALLBACK
// =====================================
void callback(char* topic,byte* payload,unsigned int length){
	String msg;
	for(uint32_t i=0;i<length;i++){
		msg+=(char)payload[i];
	}

	// =================================
	// response
	// =================================
	if(!strcmp(topic,pubtopicAck)){
		if(msg=="1"){
			mqttClient.publish("rain_sensor/bucket/response","OK!");
		}
	}

  	// =================================
	// reset
	// =================================
	else if(!strcmp(topic,pubtopicReset)){
		ESP.restart();
	}
}

// センサーから累積雨量を取得する関数(CRC付与・検証付き)
bool getSensorCumulativeRain(uint16_t &cumulativeRain) {
  // Modbus RTU 読み出しリクエストフレームの作成
  // 0x01(局番), 0x03(ファンクションコード), 0x00 0x00(開始アドレス), 0x00 0x01(レジスタ数1)
  byte request[8] = { SENSOR_ADDR, 0x03, 0x00, 0x00, 0x00, 0x01, 0x00, 0x00 };

  // 16bit CRCを計算して末尾に格納 (L, Hの順)
  uint16_t crc = calculateCRC(request, 6);
  request[6] = crc & 0xFF;         // Lowバイト
  request[7] = (crc >> 8) & 0xFF;  // Highバイト

  // シリアルバッファをクリアして送信
  while( modbusSerial.available() > 0)  modbusSerial.read();
   modbusSerial.write(request, 8);
   modbusSerial.flush();

  // レスポンスを待つ (正常時は7バイト戻る: 局番, FC, バイト数, データH, データL, CRCL, CRCH)
  delay(150);

  if ( modbusSerial.available() >= 7) {
    byte response[7];
    for (int i = 0; i < 7; i++) {
      response[i] =  modbusSerial.read();
    }

    // 受信データのCRC16検証
    uint16_t receivedCRC = response[5] | (response[6] << 8);
    uint16_t calculatedCRC = calculateCRC(response, 5);

    if (receivedCRC == calculatedCRC) {
      // データ結合 (Highバイト << 8 | Lowバイト)
      cumulativeRain = (response[3] << 8) | response[4];
      return true; // 成功
    }
  }
  return false; // 通信エラーまたはCRC不一致
}

void setup() {
  pinMode(LED, OUTPUT);
  digitalWrite(LED, LOW);
  Serial.begin(115200);
  Serial.println("\nStarting...");

  // 1. 先にWi-FiとMQTTの接続を確立する(シリアルへのデバッグゴミ混入を防ぐ)
 // WiFi.config(IPAddress(192,168,1,100), IPAddress(192,168,1,1), IPAddress(255,255,255,0));//IPアドレス決め打ちするときにはここを有効にする
  setupWiFi();
  mqttClient.setServer(mqtt_server, mqtt_port);
  timeClient.begin();
  mqttClient.setCallback(callback);

  // 2. Wi-Fi接続完了後に、センサー通信専用のシリアルポートを開く
   modbusSerial.begin(9600);
  while( modbusSerial.available() > 0)  modbusSerial.read(); // バッファのゴミを完全クリーニング

  bootTime = millis();
}

int last_processed_minute = -1;

void loop() {
  if (WiFi.status() != WL_CONNECTED) {
    setupWiFi();
  }
  if (!mqttClient.connected()) {
    reconnectMQTT();
  }
  mqttClient.loop();
  timeClient.update();

  int current_minute = timeClient.getMinutes();
  int current_hour   = timeClient.getHours();

  // =====================================================================
  // 毎正分(1分ごと)に最新の実測データを必ずMQTT送信するロジック
  // =====================================================================
  if (current_minute != last_processed_minute) {
    uint16_t current_cumulative = 0;

     // 1分に1回しか実行されないように、成否に関わらず先に分を更新しておく
    last_processed_minute = current_minute;

    // センサーからModbus経由で現在の累積雨量を取得
    if (getSensorCumulativeRain(current_cumulative)) {

      // 完全に初回起動時のみ、基準値をその場の数値にする
      if (is_first_run) {
        previous_rain = current_cumulative;
        is_first_run = false;
      }

      uint16_t hourly_diff = 0;

      // 通常時とロールオーバー(数値が溢れて0に戻った時)の計算
      if (current_cumulative >= previous_rain) {
        hourly_diff = current_cumulative - previous_rain;
      } else {
        hourly_diff = (65535 - previous_rain) + current_cumulative + 1;
      }

      // 0.1mm単位をmm単位に換算
      float hourly_rain_mm = hourly_diff * 0.1;

      // MQTT送信用のJSON文字列を作成
      String payload = "{\"hourly_rain_mm\":" + String(hourly_rain_mm, 1) + "}";

      // MQTTパブリッシュを実行
      if (mqttClient.publish(mqtt_topic, payload.c_str())) {
          // 送信が成功した時だけ、前回の値を更新する(通信エラー時のデータ欠損防止)
          previous_rain = current_cumulative;
          Serial.println("MQTT Publish Success!"); // デバッグ用
          last_processed_minute = current_minute; // 処理完了フラグをセット
      } else {
          Serial.println("MQTT Publish Failed!");  // デバッグ用
      }
    } else {
      Serial.println("Modbus Read Error!"); // センサーから返事がない、またはCRCエラー
    }
  }

  // LEDを点滅させて動作確認
  static uint32_t ledTimer = 0;
  if (millis() - ledTimer > 1000) {
    digitalWrite(LED, !digitalRead(LED));
    ledTimer = millis();
  }

  delay(10); // ループのレスポンス向上
}
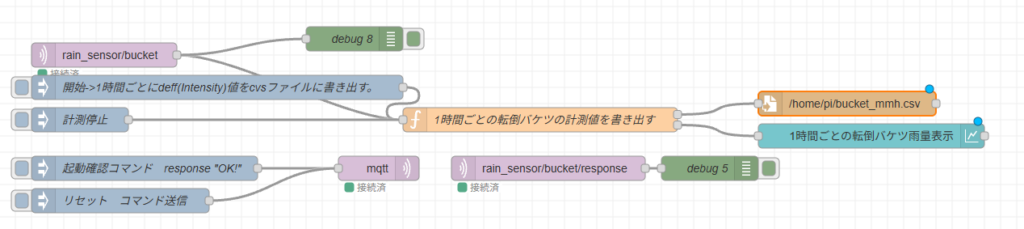
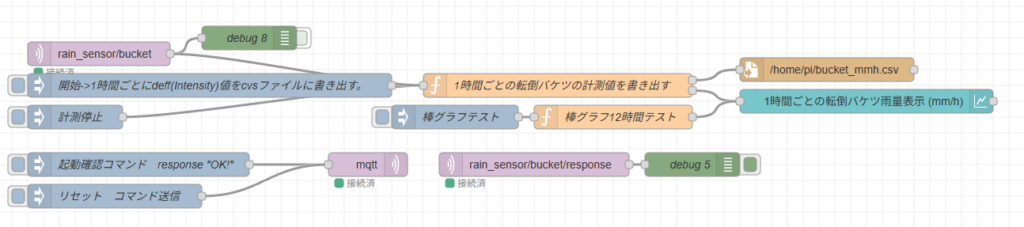
NODE-RED ( 転倒バケツ単独使用時用)
転倒バケツを単独で使用する場合の専用フローになります。
スタートボタンをクリックしておくと1時間おきにダッシュボードに折れ線グラフで表示されます。
同時にNODE-REDサーバーのRaspberry PIの「/home/pi」に「bucket_mmh.csv」で1時間おきの降雨量が記録されます。
その他の機能として「起動確認コマンド」->動作しているか確認する為のコマンド正常なら”OK!”が返る
「リセットコマンド送信」->転倒バケツのCPU ESP-WROOM-02を再起動する
折れ線グラフタイプ
[{"id":"9a9662f845faf9de","type":"tab","label":"転倒バケツ単体雨量","disabled":false,"info":"","env":[]},{"id":"e7cc835d38345dd0","type":"mqtt in","z":"9a9662f845faf9de","name":"","topic":"rain_sensor/bucket","qos":"2","datatype":"auto-detect","broker":"9f71dd2e25f745b9","nl":false,"rap":true,"rh":0,"inputs":0,"x":170,"y":260,"wires":[["59c8baa9fbbaf232","69ab943d3c5ffa28"]]},{"id":"70a17e9d17f047fb","type":"inject","z":"9a9662f845faf9de","name":"開始->1時間ごとにdeff(Intensity)値をcvsファイルに書き出す。","props":[{"p":"payload"},{"p":"topic","vt":"str"}],"repeat":"","crontab":"","once":false,"onceDelay":0.1,"topic":"toggle_monitor","payload":"start","payloadType":"str","x":310,"y":300,"wires":[["69ab943d3c5ffa28"]]},{"id":"409f2132ab9fb573","type":"inject","z":"9a9662f845faf9de","name":"計測停止","props":[{"p":"payload"},{"p":"topic","vt":"str"}],"repeat":"","crontab":"","once":false,"onceDelay":0.1,"topic":"toggle_monitor","payload":"stop","payloadType":"str","x":140,"y":340,"wires":[["69ab943d3c5ffa28"]]},{"id":"145640c70dd7578c","type":"file","z":"9a9662f845faf9de","name":"","filename":"/home/pi/bucket_mmh.csv","filenameType":"str","appendNewline":false,"createDir":false,"overwriteFile":"false","encoding":"none","x":1090,"y":280,"wires":[[]]},{"id":"0d13c63f30c07bee","type":"inject","z":"9a9662f845faf9de","name":"起動確認コマンド response \"OK!\"","props":[{"p":"payload"},{"p":"topic","vt":"str"}],"repeat":"","crontab":"","once":false,"onceDelay":0.1,"topic":"rain_sensor/bucket/ack","payload":"1","payloadType":"str","x":220,"y":400,"wires":[["0d25e17c97664e3b"]]},{"id":"0d25e17c97664e3b","type":"mqtt out","z":"9a9662f845faf9de","name":"","topic":"","qos":"","retain":"","respTopic":"","contentType":"","userProps":"","correl":"","expiry":"","broker":"9f71dd2e25f745b9","x":510,"y":400,"wires":[]},{"id":"fe39f705b7b8d362","type":"inject","z":"9a9662f845faf9de","name":"リセット コマンド送信","props":[{"p":"payload"},{"p":"topic","vt":"str"}],"repeat":"","crontab":"","once":false,"onceDelay":0.1,"topic":"rain_sensor/bucket/reset","payload":"1","payloadType":"str","x":190,"y":440,"wires":[["0d25e17c97664e3b"]]},{"id":"b2f8688881426d55","type":"mqtt in","z":"9a9662f845faf9de","name":"","topic":"rain_sensor/bucket/response","qos":"2","datatype":"auto-detect","broker":"9f71dd2e25f745b9","nl":false,"rap":true,"rh":0,"inputs":0,"x":720,"y":400,"wires":[["006f270e491454d3"]]},{"id":"006f270e491454d3","type":"debug","z":"9a9662f845faf9de","name":"debug 5","active":true,"tosidebar":true,"console":false,"tostatus":false,"complete":"false","statusVal":"","statusType":"auto","x":920,"y":400,"wires":[]},{"id":"075d3a7cc219daf1","type":"ui_chart","z":"9a9662f845faf9de","name":"","group":"c5f9840516d9c74c","order":5,"width":0,"height":0,"label":"1時間ごとの転倒バケツ雨量表示 (mm/h)","chartType":"line","legend":"false","xformat":"HH:mm","interpolate":"linear","nodata":"","dot":true,"ymin":"","ymax":"","removeOlder":"24","removeOlderPoints":"","removeOlderUnit":"3600","cutout":0,"useOneColor":false,"useUTC":false,"colors":["#1f77b4","#aec7e8","#ff7f0e","#2ca02c","#98df8a","#d62728","#ff9896","#9467bd","#c5b0d5"],"outputs":1,"useDifferentColor":false,"className":"","x":1140,"y":320,"wires":[[]]},{"id":"59c8baa9fbbaf232","type":"debug","z":"9a9662f845faf9de","name":"debug 8","active":false,"tosidebar":true,"console":false,"tostatus":false,"complete":"false","statusVal":"","statusType":"auto","x":360,"y":240,"wires":[]},{"id":"69ab943d3c5ffa28","type":"function","z":"9a9662f845faf9de","name":"1時間ごとの転倒バケツの計測値を書き出す","func":"// --- 転倒バケツ雨量計 単独ロギング&2系統出力フロー ---\n\n// 0. 受信データの自動JSONパース処理\nif (typeof msg.payload === \"string\") {\n try {\n msg.payload = JSON.parse(msg.payload);\n } catch (e) {\n // 無視\n }\n} else if (Buffer.isBuffer(msg.payload)) {\n try {\n msg.payload = JSON.parse(msg.payload.toString());\n } catch (e) {\n // パース失敗時\n }\n}\n\n// メモリ(context)から現在の状態を取得\nlet isRunning = context.get(\"isRunning\") || false;\nlet lastLogHour = context.get(\"lastLogHour\") || -1;\nlet latestMeasuredRain = context.get(\"latestMeasuredRain\") || 0.0;\n// グラフの過去データを保存する履歴配列を取得\nlet lineHistory = context.get(\"lineHistory\") || [];\n\n// 1. Injectボタンからメッセージが届いた場合の処理\nif (msg.payload === \"start\") {\n isRunning = true;\n context.set(\"isRunning\", isRunning);\n node.status({ fill: \"green\", shape: \"dot\", text: \"バケツ監視中: 累計 \" + latestMeasuredRain.toFixed(1) + \"mm\" });\n return null;\n}\n\nif (msg.payload === \"stop\") {\n isRunning = false;\n context.set(\"isRunning\", isRunning);\n node.status({ fill: \"red\", shape: \"dot\", text: \"監視停止中\" });\n return null;\n}\n\nif (!isRunning) {\n node.status({ fill: \"red\", shape: \"dot\", text: \"監視停止中\" });\n return null;\n}\n\n// 2. 転倒バケツ雨量計からのデータ受信処理\nlet isDataReceived = false;\nif (msg.topic === \"rain_sensor/bucket\") {\n if (msg.payload && msg.payload.hourly_rain_mm !== undefined) {\n let rainVal = parseFloat(msg.payload.hourly_rain_mm);\n if (!isNaN(rainVal)) {\n latestMeasuredRain += rainVal; \n context.set(\"latestMeasuredRain\", latestMeasuredRain);\n isDataReceived = true; \n }\n }\n}\n\n// リアルタイム状態表示の更新\nnode.status({ fill: \"green\", shape: \"dot\", text: `監視中: 現在の1時間累計=${latestMeasuredRain.toFixed(1)}mm` });\n\n\n// 3. 【正時判定&2系統一斉出力】\nconst now = new Date();\nconst currentHour = now.getHours();\n\n// 初回起動時の時間合わせ\nif (lastLogHour === -1) {\n lastLogHour = currentHour;\n context.set(\"lastLogHour\", lastLogHour);\n}\n\n// データ受信時に「時間が進んだ(次の時間になった)」ら出力\nif (isDataReceived && currentHour !== lastLogHour) {\n const year = now.getFullYear();\n const month = String(now.getMonth() + 1).padStart(2, '0');\n const date = String(now.getDate()).padStart(2, '0');\n const logHour = String(lastLogHour).padStart(2, '0');\n\n // 共通の正確なタイムスタンプ\n const timestampStr = `${year}-${month}-${date} ${logHour}:00:00`;\n const timestampMs = now.getTime(); \n\n // 【1番ポート用:CSV追加書き出し形式】\n const msgCsv = { \n payload: `${timestampStr},${latestMeasuredRain.toFixed(1)}\\n` \n };\n\n // 履歴オブジェクトを1件追加\n lineHistory.push({\n x: timestampMs,\n y: parseFloat(latestMeasuredRain.toFixed(1))\n });\n\n // 過去24時間分(24件)を超えたら古い履歴を削除\n if (lineHistory.length > 24) {\n lineHistory.shift();\n }\n context.set(\"lineHistory\", lineHistory);\n\n // 【2番ポート用:ui_chart(折れ線グラフ)専用形式】\n const msgChart = {\n topic: \"雨量 (mm/h)\",\n payload: [{\n series: [\"雨量\"],\n data: [ lineHistory ] \n }]\n };\n\n // 次の時間のために累積雨量を「0.0」にリセットし、時間を更新\n context.set(\"latestMeasuredRain\", 0.0);\n context.set(\"lastLogHour\", currentHour);\n\n // [1番ポート, 2番ポート] の順に同時にメッセージを射出\n return [msgCsv, msgChart];\n}\n\nreturn null;\n\n\n","outputs":2,"timeout":0,"noerr":0,"initialize":"","finalize":"","libs":[],"x":750,"y":300,"wires":[["145640c70dd7578c"],["075d3a7cc219daf1"]]},{"id":"line_test_12h","type":"inject","z":"9a9662f845faf9de","name":" 折れ線グラフ12時間テスト","props":[{"p":"payload"},{"p":"topic","vt":"str"}],"repeat":"","crontab":"","once":false,"onceDelay":0.1,"topic":"雨量 (mm/h)","payload":"[{\"series\":[\"雨量\"],\"data\":[[{\"x\":1789009200000,\"y\":7},{\"x\":1789012800000,\"y\":10},{\"x\":1789016400000,\"y\":20},{\"x\":1789020000000,\"y\":7},{\"x\":1789023600000,\"y\":5},{\"x\":1789027200000,\"y\":3},{\"x\":1789030800000,\"y\":0},{\"x\":1789034400000,\"y\":10},{\"x\":1789038000000,\"y\":18},{\"x\":1789041600000,\"y\":30},{\"x\":1789045200000,\"y\":10},{\"x\":1789048800000,\"y\":4}]]}]","payloadType":"json","x":730,"y":360,"wires":[["075d3a7cc219daf1"]]},{"id":"9f71dd2e25f745b9","type":"mqtt-broker","name":"","broker":"192.168.1.200","port":1883,"clientid":"","autoConnect":true,"usetls":false,"protocolVersion":4,"keepalive":60,"cleansession":true,"autoUnsubscribe":true,"birthTopic":"","birthQos":"0","birthRetain":"false","birthPayload":"","birthMsg":{},"closeTopic":"","closeQos":"0","closeRetain":"false","closePayload":"","closeMsg":{},"willTopic":"","willQos":"0","willRetain":"false","willPayload":"","willMsg":{},"userProps":"","sessionExpiry":""},{"id":"c5f9840516d9c74c","type":"ui_group","name":"最新降雨センサー","tab":"c33628f25ab2c236","order":1,"disp":true,"width":14,"collapse":false,"className":""},{"id":"c33628f25ab2c236","type":"ui_tab","name":"天気","icon":"dashboard","disabled":false,"hidden":false},{"id":"ab21a1ef91e33661","type":"global-config","env":[],"modules":{"node-red-dashboard":"3.6.6"}}]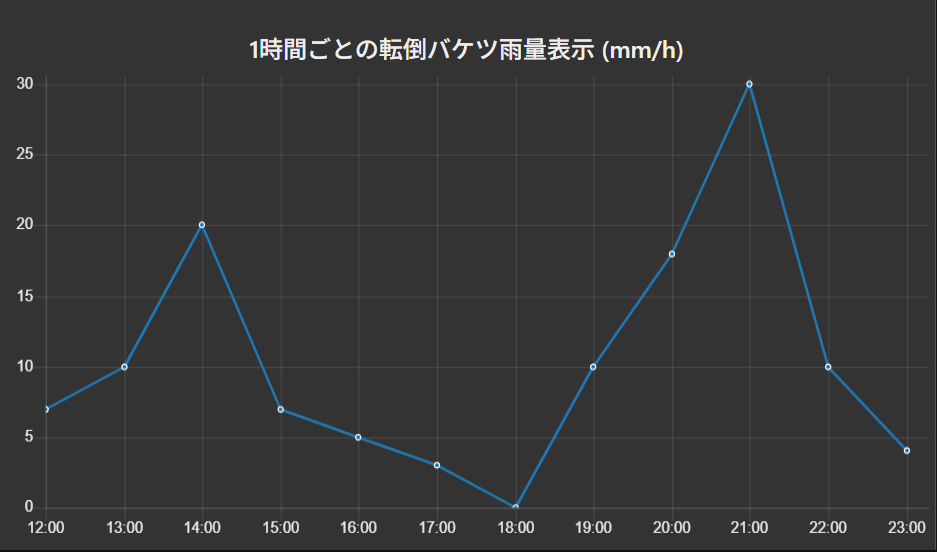
棒グラフタイプ
[{"id":"9a9662f845faf9de","type":"tab","label":"転倒バケツ単体雨量","disabled":false,"info":"","env":[]},{"id":"e7cc835d38345dd0","type":"mqtt in","z":"9a9662f845faf9de","name":"","topic":"rain_sensor/bucket","qos":"2","datatype":"auto-detect","broker":"9f71dd2e25f745b9","nl":false,"rap":true,"rh":0,"inputs":0,"x":170,"y":260,"wires":[["59c8baa9fbbaf232","69ab943d3c5ffa28"]]},{"id":"70a17e9d17f047fb","type":"inject","z":"9a9662f845faf9de","name":"開始->1時間ごとにdeff(Intensity)値をcvsファイルに書き出す。","props":[{"p":"payload"},{"p":"topic","vt":"str"}],"repeat":"","crontab":"","once":false,"onceDelay":0.1,"topic":"toggle_monitor","payload":"start","payloadType":"str","x":310,"y":300,"wires":[["69ab943d3c5ffa28"]]},{"id":"409f2132ab9fb573","type":"inject","z":"9a9662f845faf9de","name":"計測停止","props":[{"p":"payload"},{"p":"topic","vt":"str"}],"repeat":"","crontab":"","once":false,"onceDelay":0.1,"topic":"toggle_monitor","payload":"stop","payloadType":"str","x":140,"y":340,"wires":[["69ab943d3c5ffa28"]]},{"id":"145640c70dd7578c","type":"file","z":"9a9662f845faf9de","name":"","filename":"/home/pi/bucket_mmh.csv","filenameType":"str","appendNewline":false,"createDir":false,"overwriteFile":"false","encoding":"none","x":1090,"y":280,"wires":[[]]},{"id":"0d13c63f30c07bee","type":"inject","z":"9a9662f845faf9de","name":"起動確認コマンド response \"OK!\"","props":[{"p":"payload"},{"p":"topic","vt":"str"}],"repeat":"","crontab":"","once":false,"onceDelay":0.1,"topic":"rain_sensor/bucket/ack","payload":"1","payloadType":"str","x":220,"y":400,"wires":[["0d25e17c97664e3b"]]},{"id":"0d25e17c97664e3b","type":"mqtt out","z":"9a9662f845faf9de","name":"","topic":"","qos":"","retain":"","respTopic":"","contentType":"","userProps":"","correl":"","expiry":"","broker":"9f71dd2e25f745b9","x":510,"y":400,"wires":[]},{"id":"fe39f705b7b8d362","type":"inject","z":"9a9662f845faf9de","name":"リセット コマンド送信","props":[{"p":"payload"},{"p":"topic","vt":"str"}],"repeat":"","crontab":"","once":false,"onceDelay":0.1,"topic":"rain_sensor/bucket/reset","payload":"1","payloadType":"str","x":190,"y":440,"wires":[["0d25e17c97664e3b"]]},{"id":"b2f8688881426d55","type":"mqtt in","z":"9a9662f845faf9de","name":"","topic":"rain_sensor/bucket/response","qos":"2","datatype":"auto-detect","broker":"9f71dd2e25f745b9","nl":false,"rap":true,"rh":0,"inputs":0,"x":720,"y":400,"wires":[["006f270e491454d3"]]},{"id":"006f270e491454d3","type":"debug","z":"9a9662f845faf9de","name":"debug 5","active":true,"tosidebar":true,"console":false,"tostatus":false,"complete":"false","statusVal":"","statusType":"auto","x":920,"y":400,"wires":[]},{"id":"075d3a7cc219daf1","type":"ui_chart","z":"9a9662f845faf9de","name":"","group":"c5f9840516d9c74c","order":5,"width":0,"height":0,"label":"1時間ごとの転倒バケツ雨量表示 (mm/h)","chartType":"bar","legend":"false","xformat":"HH:mm","interpolate":"linear","nodata":"","dot":true,"ymin":"","ymax":"","removeOlder":"24","removeOlderPoints":"","removeOlderUnit":"3600","cutout":0,"useOneColor":true,"useUTC":false,"colors":["#1f77b4","#aec7e8","#ff7f0e","#2ca02c","#98df8a","#d62728","#ff9896","#9467bd","#c5b0d5"],"outputs":1,"useDifferentColor":false,"className":"","x":1140,"y":320,"wires":[[]]},{"id":"59c8baa9fbbaf232","type":"debug","z":"9a9662f845faf9de","name":"debug 8","active":false,"tosidebar":true,"console":false,"tostatus":false,"complete":"false","statusVal":"","statusType":"auto","x":360,"y":240,"wires":[]},{"id":"69ab943d3c5ffa28","type":"function","z":"9a9662f845faf9de","name":"1時間ごとの転倒バケツの計測値を書き出す","func":"// --- 転倒バケツ雨量計 単独ロギング&2系統出力フロー(棒グラフ対応版) ---\n\n// 0. 受信データの自動JSONパース処理\nif (typeof msg.payload === \"string\") {\n try {\n msg.payload = JSON.parse(msg.payload);\n } catch (e) {\n // 無視\n }\n} else if (Buffer.isBuffer(msg.payload)) {\n try {\n msg.payload = JSON.parse(msg.payload.toString());\n } catch (e) {\n // パース失敗時\n }\n}\n\n// メモリ(context)から現在の状態を取得\nlet isRunning = context.get(\"isRunning\") || false;\nlet lastLogHour = context.get(\"lastLogHour\") || -1;\nlet latestMeasuredRain = context.get(\"latestMeasuredRain\") || 0.0;\n\n// 【変更点】棒グラフ用にラベルとデータの履歴配列を取得(別々に管理します)\nlet barLabels = context.get(\"barLabels\") || []; // \"15:00\" などの文字列が入る配列\nlet barData = context.get(\"barData\") || []; // 数値が入る配列\n\n// 1. Injectボタンからメッセージが届いた場合の処理\nif (msg.payload === \"start\") {\n isRunning = true;\n context.set(\"isRunning\", isRunning);\n node.status({ fill: \"green\", shape: \"dot\", text: \"バケツ監視中: 累計 \" + latestMeasuredRain.toFixed(1) + \"mm\" });\n return null;\n}\n\nif (msg.payload === \"stop\") {\n isRunning = false;\n context.set(\"isRunning\", isRunning);\n node.status({ fill: \"red\", shape: \"dot\", text: \"監視停止中\" });\n return null;\n}\n\nif (!isRunning) {\n node.status({ fill: \"red\", shape: \"dot\", text: \"監視停止中\" });\n return null;\n}\n\n// 2. 転倒バケツ雨量計からのデータ受信処理\nlet isDataReceived = false;\nif (msg.topic === \"rain_sensor/bucket\") {\n if (msg.payload && msg.payload.hourly_rain_mm !== undefined) {\n let rainVal = parseFloat(msg.payload.hourly_rain_mm);\n if (!isNaN(rainVal)) {\n latestMeasuredRain += rainVal; \n context.set(\"latestMeasuredRain\", latestMeasuredRain);\n isDataReceived = true; \n }\n }\n}\n\n// リアルタイム状態表示 of 更新\nnode.status({ fill: \"green\", shape: \"dot\", text: `監視中: 現在の1時間累計=${latestMeasuredRain.toFixed(1)}mm` });\n\n\n// 3. 【正時判定&2系統一斉出力】\nconst now = new Date();\nconst currentHour = now.getHours();\n\n// 初回起動時の時間合わせ\nif (lastLogHour === -1) {\n lastLogHour = currentHour;\n context.set(\"lastLogHour\", lastLogHour);\n}\n\n// データ受信時に「時間が進んだ(次の時間になった)」ら出力\nif (isDataReceived && currentHour !== lastLogHour) {\n const year = now.getFullYear();\n const month = String(now.getMonth() + 1).padStart(2, '0');\n const date = String(now.getDate()).padStart(2, '0');\n const logHour = String(lastLogHour).padStart(2, '0');\n\n // 共通の正確なタイムスタンプ\n const timestampStr = `${year}-${month}-${date} ${logHour}:00:00`;\n const labelStr = `${logHour}:00`; // グラフの横軸に表示する時間ラベル\n\n // 【1番ポート用:CSV追加書き出し形式】\n const msgCsv = { \n payload: `${timestampStr},${latestMeasuredRain.toFixed(1)}\\n` \n };\n\n // 棒グラフ用の配列にそれぞれデータを追加\n barLabels.push(labelStr);\n barData.push(parseFloat(latestMeasuredRain.toFixed(1)));\n\n // 過去24時間分(24件)を超えたら古い履歴を削除\n if (barLabels.length > 24) {\n barLabels.shift();\n barData.shift();\n }\n context.set(\"barLabels\", barLabels);\n context.set(\"barData\", barData);\n\n // 【2番ポート用:ui_chart(棒グラフ)専用形式】\n const msgChart = {\n payload: [\n {\n \"series\": [\"降雨量\"],\n \"data\": [ barData ], // 配列の中に配列を入れる必要あり\n \"labels\": barLabels\n }\n ]\n };\n\n // 次の時間のために累積雨量を「0.0」にリセットし、時間を更新\n context.set(\"latestMeasuredRain\", 0.0);\n context.set(\"lastLogHour\", currentHour);\n\n // [1番ポート, 2番ポート] の順に同時にメッセージを射出\n return [msgCsv, msgChart];\n}\n\nreturn null;\n\n\n\n","outputs":2,"timeout":0,"noerr":0,"initialize":"","finalize":"","libs":[],"x":750,"y":300,"wires":[["145640c70dd7578c"],["075d3a7cc219daf1"]]},{"id":"b280e8a2ba108408","type":"inject","z":"9a9662f845faf9de","name":"棒グラフテスト","props":[{"p":"payload"},{"p":"topic","vt":"str"}],"repeat":"","crontab":"","once":false,"onceDelay":0.1,"topic":"","payload":"","payloadType":"date","x":620,"y":340,"wires":[["2e75c203cf41dad0"]]},{"id":"2e75c203cf41dad0","type":"function","z":"9a9662f845faf9de","name":"棒グラフ12時間テスト","func":"// --- ui_chart(棒グラフ)表示テスト用データ生成 ---\n\nconst barLabels = [];\nconst barData = [];\n\n// 現在時刻から「12時間前」の起点時間を計算\nconst now = new Date();\n\nfor (let i = 11; i >= 0; i--) {\n // 1時間ずつ過去に遡る\n const pastTime = new Date(now.getTime() - (i * 60 * 60 * 1000));\n const logHour = String(pastTime.getHours()).padStart(2, '0');\n \n // 横軸のラベル(例: \"15:00\")\n barLabels.push(`${logHour}:00`);\n \n // 擬似の降雨量(0.0 〜 5.5mm の間でランダムな数値を1桁に丸める)\n const mockRain = parseFloat((Math.random() * 5.5).toFixed(1));\n barData.push(mockRain);\n}\n\n// ui_chart が要求する棒グラフ専用のデータ構造\nmsg.payload = [\n {\n \"series\": [\"降雨量(テスト)\"],\n \"data\": [ barData ], // 配列の中にデータ配列を入れる\n \"labels\": barLabels\n }\n];\n\nreturn msg;\n","outputs":1,"timeout":0,"noerr":0,"initialize":"","finalize":"","libs":[],"x":820,"y":340,"wires":[["075d3a7cc219daf1"]]},{"id":"9f71dd2e25f745b9","type":"mqtt-broker","name":"","broker":"192.168.1.200","port":1883,"clientid":"","autoConnect":true,"usetls":false,"protocolVersion":4,"keepalive":60,"cleansession":true,"autoUnsubscribe":true,"birthTopic":"","birthQos":"0","birthRetain":"false","birthPayload":"","birthMsg":{},"closeTopic":"","closeQos":"0","closeRetain":"false","closePayload":"","closeMsg":{},"willTopic":"","willQos":"0","willRetain":"false","willPayload":"","willMsg":{},"userProps":"","sessionExpiry":""},{"id":"c5f9840516d9c74c","type":"ui_group","name":"最新降雨センサー","tab":"c33628f25ab2c236","order":1,"disp":true,"width":14,"collapse":false,"className":""},{"id":"c33628f25ab2c236","type":"ui_tab","name":"天気","icon":"dashboard","disabled":false,"hidden":false},{"id":"2af39415f262aa5f","type":"global-config","env":[],"modules":{"node-red-dashboard":"3.6.6"}}]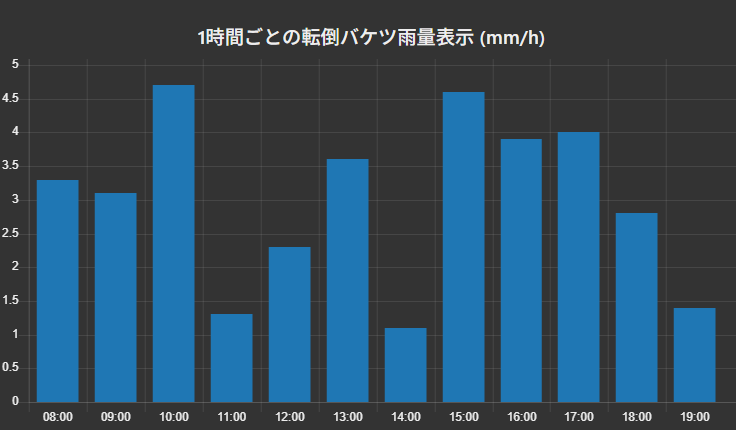
完成品 内部
CPU基板をタカチ SW100Bケースに収め、転倒バケツ降雨計の内部にギリギリだが収めた。
外部からの配線はDC5Vラインのみ配線が必要になります。
動作しているかどうか確認の為、箱の上面にLEDを付けて周期点滅させている。
運用して見ると、結構小さなごみが雨滴が落下する細い部分に詰まる事が判明した。
従ってかなり頻繁に点検が必要になる、おそらく1週間に1回程度。
あとは、鹿威しのようなカタッという音が結構大きいので隣近所が近いと迷惑になる可能性
大、私は東京近郊に移動してマンションに移設設置した時には、音が出る部分にスポンジ
を取り付けて何とか解決した次第です。(カタッがコトッに変わった)
この辺は機械式の宿命と思われる。
あとは実測して電子式雨量計の降雨量の換算方程式を求める為、この転倒バケツ式雨量計で計
測した実雨量を「scikit-learn使って学習させ近似方程式を求める」と作業が残っているが
私事で恐縮ですが、体を壊してしまい田舎にしばらく住めなくなったので実験ができなくなり
急遽機材を東京近郊の住まいに移してみたが、マンションなので設置する適当な場所が見つか
らず実験が出来ずにおりますので更新はいつになるやら状態になっております。